YUM config file, /etc/yum.conf does not contain any proxy definitions ala:
[main]
proxy=http://localhost:8080
proxy_username=put_proxy_user_name_here
proxy_password=put_proxy_user_password_here
YUM config file, /etc/yum.conf does not contain any proxy definitions ala:
[main]
proxy=http://localhost:8080
proxy_username=put_proxy_user_name_here
proxy_password=put_proxy_user_password_here
August 15, 2014
Samba Server Configuration for CentOS 7 (Guide)
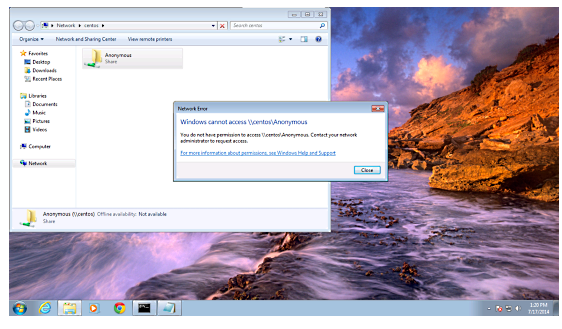
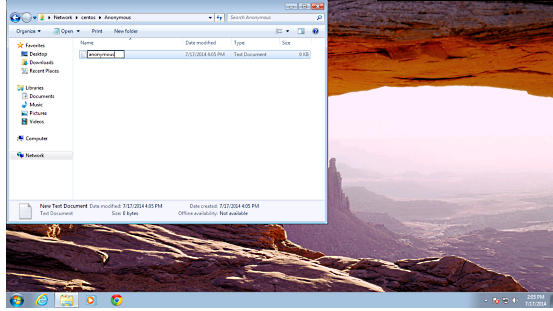
Samba offers file and print services for various clients of Microsoft Windows. It can also integrate with a Windows Server domain. This guide offers the procedure for Samba server configuration in CentOS 7 with anonymous and secured Samba servers.
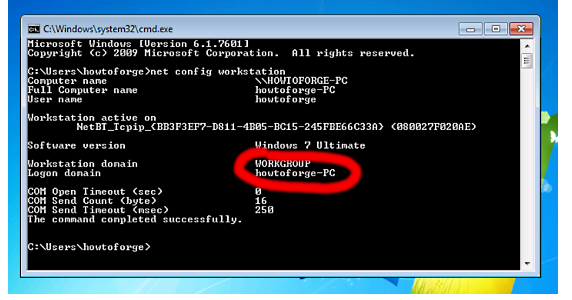
Samba server CentOS7 also allows for interoperability between Linux/Unix servers as well as Windows-based clients. You need to have one Windows machine to check the CentOS 7 server. The Windows machine must lie on the same workgroup. In order to check the value in the Windows machine, you need to run the “net config workstation” command in cmd prompt.
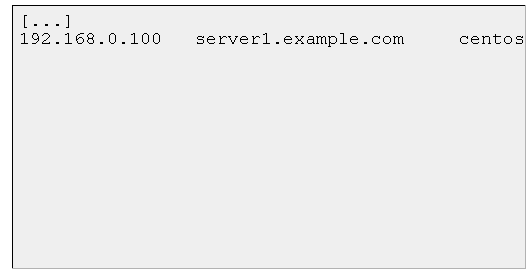
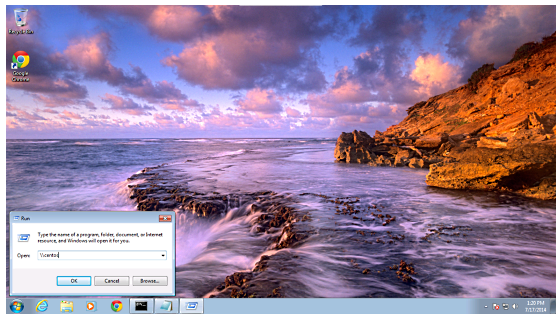
In order to make windows client reachable, add the entry of your server IP address in the Run terminal.
“notepad C:\Windows\System32\drivers\etc\hosts”
The example values are as follows.
“yum install samba samba-client samba-common”
“mv /etc/samba/smb.conf /etc/samba/smb.conf.bak”
“vi /etc/samba/smb.conf
mkdir -p /samba/anonymous
systemctl enable smb.service
systemctl enable nmb.service
systemctl restart smb.service
systemctl restart nmb.service”
“firewall-cmd –permanent –zone=public –add-service=samba”
“[root@server1 ~]# firewall-cmd –permanent –zone=public –add-service=samba
success
[root@server1 ~]#”
“firewall-cmd –reload”
“ls –l”
“cd /samba
chmod -R 0755 anonymous/
chown -R nobody:nobody anonymous/
ls -l anonymous/”
“chcon -t samba_share_t anonymous/”
“ls -l anonymous/”
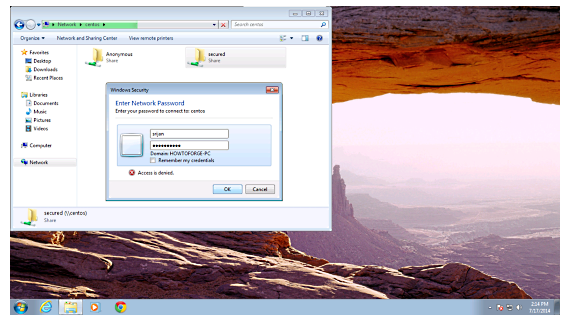
“groupadd smbgrp
useradd srijan -G smbgrp
“smbpasswd -a srijan”
“mkdir -p /samba/secured”
“cd /samba
chmod -R 0777 secured/
chcon -t samba_share_t secured/”
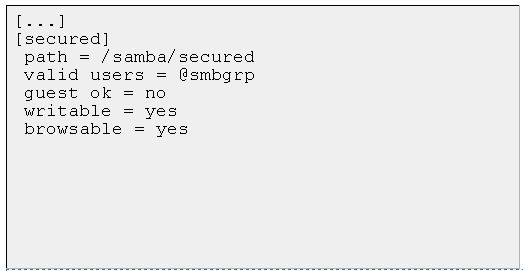
“vi /etc/samba/smb.conf”
“systemctl restart smb.service
systemctl restart nmb.service “
“testparm”
“cd /samba
chown -R srijan:smbgrp secured/”

This article should be useful in applying CentOS Samba configuration for anonymous servers.
CentOS / RHEL: Delete Old Yum Repositories and Configuration Files
ow do I delete old yum repositories and configuration files under RHEL 5 or CentOS Linux server?
You can delete old yum repositories and its configuration files from /etc/yum.repos.d/ directory
Type the following commands# cd /etc/yum.repos.d/# ls -l
Sample outputs:
-rw-r--r-- 1 root root 954 Aug 11 2010 epel.repo
-rw-r--r-- 1 root root 1054 Aug 11 2010 epel-testing.repo
-rw-r--r-- 1 root root 561 Dec 14 2010 rhel-debuginfo.repo
-rw-r--r-- 1 root root 222 Dec 14 2010 rhel-source.repo
-rw-r--r-- 1 root root 235 Jan 16 15:27 srpm.repo
To delete epel.repo, enter:# rm epel.repo epel-testing.repo### ***************************** ###### make sure you delete GPG keys also ###### ***************************** #### rm /etc/pki/rpm-gpg/RPM-GPG-KEY-EPEL# yum clean all
First, find out repo package name, enter:# rpm -qa | grep epel
Sample outputs:
epel-release-5-4
# yum remove epel-release-5-4# yum clean all
How to Install and Configure OTRS 3.3.X in Centos 6.5 64 bit.
Login as root
Donwload the rpm Package
wget http://ftp.otrs.org/pub/otrs/RPMS/rhel/6/otrs-3.3.5-02.noarch.rpm
Install the rpm Package
yum localinstall -y otrs-3.3.5-02.noarch.rpm
set selinux to permissive mode
setenforce 0
Restart Apache and MySQL
service httpd restart
service mysqld restart
Start OTRS service
service otrs start
Open web browser and add in url your server_ip_or_doamin
http://server_ip_or_domain/otrs/installer.pl
Step 1. Accept the GPL Agreement if you want to install OTRS
Step 2. Give Database details in
Step 3. It will ask for mail record, add the smtp & pop server detail
Step 4. At last it will give username and password, Kindly copy this info
Again Open web browser and add in url your server_ip_or_doamin for Agent Interface
http://server_ip_or_domain/otrs/index.pl
Again Open web browser and add in url your server_ip_or_doamin for Customer Interface
http://server_ip_or_domain/otrs/customer.pl
How to install & configure Tomcat 6 on Centos 6.5
login as root
yum update
yum install -y java
yum install tomcat6 tomcat6-webapps tomcat6-admin-webapps
You can modify default port 8080 to 80 (if required)
vi /usr/share/tomcat6/conf/server.xml
<Connector port="80" protocol="HTTP/1.1"
connectionTimeout="20000"
redirectPort="8443" />
For tomcat admin modify file
vi /usr/share/tomcat6/conf/tomcat-users.xml
add line
<user username="admin" password="tomcatpass" roles="manager"/>
in between <tomcat-users> & </tomcat-users>
Add permanent at start-up
chkconfig tomcat6 on
Start tomcat
service tomcat6 start
Add port on iptables
iptables -I INPUT -p tcp --dport 8o -j ACCEPT
service iptables save
service iptables restart
Open browser and add url or ip of your server in address bar
click on Tomcat Manager give username and password as you have added on the file tomact-users.xml as admin and tomcatpass

How to install & configure OCSInventory 2.1 Agent on Centos 6.5 64 bit
OCSInventory 2.1 Agent Client Side installation on Linux Centos6
OCSInventory 2.1 Agent install on linux Centos 6.5 64 bit
yum install -y perl-XML-Simple perl-Compress-Zlib perl-Net-IP perl-LWP perl-Digest-MD5 perl-Net-SSLeay
yum install -y perl-Crypt-SSLeay perl-Net-SNMP perl-Proc-Daemon perl-Proc-PID-File perl-Sys-Syslog pciutils smartmontools monitor-edid
wget https://launchpad.net/ocsinventory-unix-agent/stable-2.1/2.1rc1/+download/Ocsinventory-Unix-Agent-2.1rc1.tar.gz
tar zxvf Ocsinventory-Unix-Agent-2.1rc1.tar.gz
cd Ocsinventory-Unix-Agent-2.1rc1
perl Makefile.PL
make
make install
Do you want to configure the agent
press y
Where do you want to write the configuration file?
press 2
Do you want to create the directory /etc/ocsinventory-agent?
press y
Should the old linux_agent settings be imported ?
Type n
What is the address of your ocs server?
Type server name or ip (192.168.1.126)
Do you need credential for the server?
Type n
Do you want to apply an administrative tag on this machine
Type n
Do yo want to install the cron task in /etc/cron.d
Type y
Do you want to create the /var/lib/ocsinventory-agent directory?
Type y
Should I remove the old linux_agent
Type n
Do you want to activate debug configuration option ?
Type y
Do you want to use OCS Inventory NG UNix Unified agent log file ?
Type n
Do you want disable SSL CA verification configuration option (not recommended) ?
Type n
Do you want to set CA certificate chain file path ?
Type n
Do you want to use OCS-Inventory software deployment feature?
Type y
Do you want to use OCS-Inventory SNMP scans feature?
Type y
Do you want to send an inventory of this machine?
Type y
To check the status of server
ocsinventory-agent -f
How to install & configure Nagios 4.x on Centos 6.5
login as root user
yum install httpd php gcc glibc glibc-common gd gd-devel -y
useradd nagios
groupadd nagcmd
usermod -a -G nagcmd nagios
usermod -a -G nagcmd apache
wget http://prdownloads.sourceforge.net/sourceforge/nagios/nagios-4.0.1.tar.gz
tar zxvf nagios-4.0.1.tar.gz
cd nagios-4.0.1
./configure --with-command-group=nagcmd
make all
make install
make install-init
make install-config
make install-commandmode
make install-webconf
cp -R contrib/eventhandlers/ /usr/local/nagios/libexec/
chown -R nagios:nagios /usr/local/nagios/libexec/eventhandlers
htpasswd -c /usr/local/nagios/etc/htpasswd.users nagiosadmin
wget https://www.nagios-plugins.org/download/nagios-plugins-1.5.tar.gz
tar xzvf nagios-plugins-1.5.tar.gz
cd nagios-plugins-1.5
./configure --with-nagios-user=nagios --with-nagios-group=nagios
make
make install
SELinux is enforcing then add this line.
semanage fcontext -a -t httpd_sys_content_t /usr/local/nagios/
Set nagios at auto-start & service to start
chkconfig nagios on
chkconfig httpd on
service httpd start
service nagios start
http://localhost/nagios or http://yourserver/nagios
username nagiosadmin
password password
How to install & configure MySql 5.1 on Centos 6.5 64 bit
Login as root
yum update -y
yum install -y mysql mysql-server
Add for auto-restart
chkconfig mysqld on
Start MySql Server
service mysqld start
For secure run this script
mysql_secure_installation
add root password, remove test database and anonymous user
Add port on iptables
iptables -I INPUT -p tcp --dport 3306 -j ACCEPT
service iptables save
service iptables restart
mysql -uroot -pyourpassword
you will be in mysql prompt to quit type exit.
How to install & configure OCSInventory 2.1 Server on Centos 6.5 64 bit
login as root
Download EPEL
wget http://download.fedoraproject.org/pub/epel/6/x86_64/epel-release-6-8.noarch.rpm
rpm -ivh epel-release-6-8.noarch.rpm
yum update -y
yum groupinstall -y "Development tools"
yum install -y httpd httpd-devel mod_perl mod_php mod_ssl php-gd php-mysql php-mbstring php perl
yum install -y perl-XML-Simple perl-Compress-Zlib perl-DBI perl-DBD-MySQL perl-Net-IP perl-SOAP-Lite perl-Apache-DBI
yum install -y perl-Apache2-SOAP perl-XML-Entities
yum install -y mysql-server mysql make
Start Service at BootTime
chkconfig httpd on && chkconfig mysqld on
Start Service Iptables add ports 80 for Apache & 3306 for MySql
service iptables start
iptables -I INPUT -m multiport -ptcp --dport 80,3306 -j ACCEPT
service iptables save
service iptables restart
Start Service Apace & MySql
service httpd start && service mysqld start
Login to mysql
mysql -uroot
create database ocsweb;
grant all privileges on ocsweb.* to ocs@localhost identified by "password-2014";
exit
Download OCS SERVER for Linux
wget https://launchpad.net/ocsinventory-server/stable-2.1/2.1/+download/OCSNG_UNIX_SERVER-2.1.tar.gz
tar zxvf OCSNG_UNIX_SERVER-2.1.tar.gz
cd OCSNG_UNIX_SERVER-2.1
sh setup.sh
add enter at ever step
after installation restart apache
service httpd restart
setenforce 0
chmod 775 /usr/share/ocsinventory-reports/ocsreports
chmod 775 /usr/share/ocsinventory-reports/ocsreports/dbconfig.inc.php
http://localhost/ocsreports/
MySQL Login ocs
mySQLpassword password-2014
DatabaseName ocsweb
Mysql HostName localhost
rm /usr/share/ocsinventory-reports/ocsreports/install.php
http://localhost/ocsreports/
user admin
password admin
setenforce 1
***Very Important****
Kindly modify the file and add database password in it.
vi /etc/httpd/conf.d/z-ocsinventory-serv.conf
edit
PerlSetEnv OCS_DB_PWD password-2014
:wq